
Best Tablet Replacement Screens

There is no worse feeling than going through the hassle of taking the phone/tablet apart, installing the new screen and putting it back together only to find that your new screen has a bad digitizer, lines, or dead pixels. Compatible models: -All iPad Mini & Mini 2 models: -A1432. -A1454. -A1455. -A1489. -A1490. -A1491. -All Carriers: AT&T,T-Mobile,Sprint,Verizon. Package content: 1 X Digitizer replacement with IC and home button + Sticky adhesive + Premium Tool Kit.
Reviews
Find Best Price at Amazon"Great product, just make sure you check and understand the instructions in the Youtube videos about how to use one of these kits."
"I just installed the new digitizer last night and it seems to work great so far."
"It took me two hours, but most of that was because the screen I was removing was so cracked it made it time consuming and tedious."
"The repair kit included did not come with the necessary adhesive removal solvent or the alcohol prep pad."
"Replacement screen looks amazing almost like the original!"
"During the process of removing the adhesive backing that holds the digitizer in place, apparently it pulled a circuit apart that operates the home button so it quit working."
"The glass was great and fit well, but the home button is challenging to press and has a strange feel to it. It is lower than the glass and very hard to press."
"Both lasted only 4-5 weeks before becoming non-responsive on the majority of the touch screen."
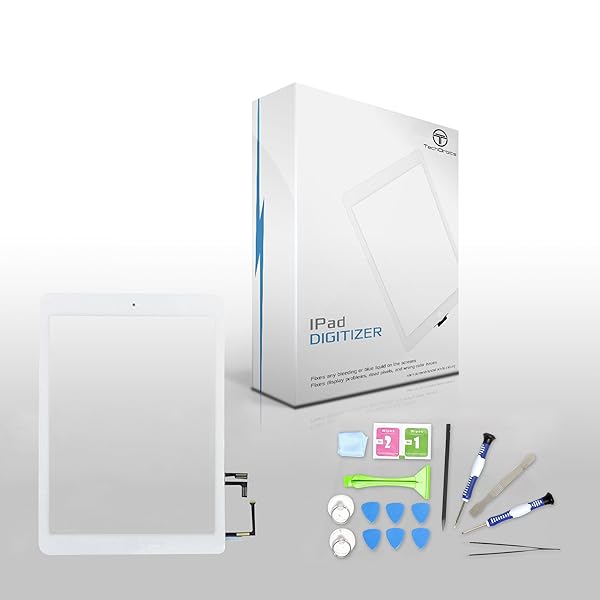
There is no worse feeling than going through the hassle of taking the phone/tablet apart, installing the new screen and putting it back together only to find that your new screen has a bad digitizer, lines, or dead pixels. Our products are designed to replace Apple components but are not sourced through or affiliated with Apple or any of its subsidiaries. Digitizer replacement for Ipad Air 1st Generation with Home button with repair tools.
Reviews
Find Best Price at Amazon"I had purchased another company's (cheaper) digitizer before this one, and installed it on my iPad Air first gen. The initial removal took awhile due to the shattered glass and sub par tools. There were no tools included with the other company's product, and the adhesive was stuck to a piece of transfer paper that had been folded up and placed in the bag with the digitizer (rendering it unsable). The first digitizer cracked along the lower left corner on the last seating push into the frame. It also made short work of cleaning all old adhesive off the frame before installing the new glass. The new glass has segmented plastic covers for all adhesive strips on the underside of the glass, as well as the adhesive strips on the home button cable and screen sensor cables. I have included a link to a good article on how to replace the digitizer, as this does not come with any instructions. I cannot speak for other people, but you wouldn't be reading this review if you planned on going with original equipment. If the color of the INSIDE of your iPad digitizer is so concerning, then you've either got too much time or too much anal retentiveness. I also read a lot of reviews that talked about a visible grid on the digitizer. Yes, this one has a visible grid - HOWEVER, the iPad has to be off, you have to get a glare on the screen, and you have to get closer to the digitizer than Apple ever intended you to be (I mean inches). ;) If you're reading this review, you're looking for a cheap alternative DIY solution to a broken digitizer because you don't want to pay Apple's insane replacement price. -Included extras (wet/dry screen wipes, cleaning cloth) work perfectly. Cons: -Home button is slightly recessed (see pic). -Antenna is silver, not gold (like original - get over it, ya bunch of whiners! See comments above). -SLIGHTLY visible grid (see comments above). Some pointers for installation: -Start in the lower left hand corner (with the home button side facing you) and work clockwise around the glass to remove it. Be careful about sticking the spudger in too far around the camera and the lower right corner (four cables in this area). -Use a hair dryer unless you have a heat gun. I used my wife's hair dryer on the hot setting and it was plenty to separate the adhesive. Any small object between the frame and digitizer is a potential crack area. I used the cleaning cloth included in this kit to GENTLY wipe any dust or particulate from the LCD just before I laid the digitizer down the final time. -Lay your digitizer over the frame loosely to test just before removing the adhesive covers. It's a lot easier to test functionality now than risk breaking your digitizer having to remove it to fix a bad connection. They both need to be standing up to avoid stressing the cables while reconnecting the LCD plug (with screws). If you can't find an answer on Google, I'm happy to assist if I am not busy with something else."
"One observation that I made but which was not emphasized in any of the videos is that it is important to heat the edge of the glass adequately while separating it. It seemed to work best to get it hot enough that it was uncomfortable to touch it for more than a second or so.----pretty hot. Also the zif socket that attaches the home button to the home button ribbon cable has a bail on it that should be lifted 90 degrees to open the socket prior to removing the cable."
"The 3M take provided to help seal the screen glass back onto the frame of the iPad didn't really hold all that well, especially in the corner where all of the cables mate with the iPad frame itself - the littlest bit of pressure there and it will pull the whole side of the glass away from the frame."
"I resorted to rubbing it off with my fingers until I had a balled up adhesive mess on the screen then I retried multiple times with the above chemicals to clean off the remaining residue until eventually - about an hours worth of effort - to get a clean screen."
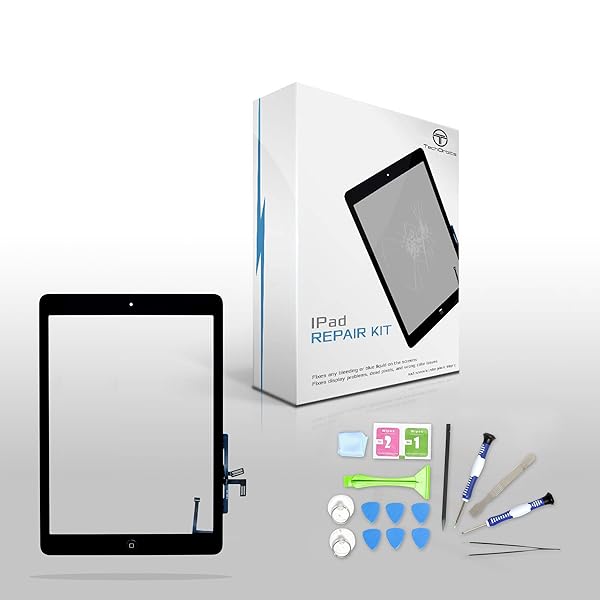
There is no worse feeling than going through the hassle of taking the phone apart, installing the new screen and putting the phone back together only to find that your new screen has a bad digitizer, lines, or dead pixels. Our products are designed to replace Apple components but are not sourced through or affiliated with Apple or any of its subsidiaries. Digitizer replacement for Ipad Air 1st Generation with Home button with repair tools.
Reviews
Find Best Price at Amazon"I had purchased another company's (cheaper) digitizer before this one, and installed it on my iPad Air first gen. The initial removal took awhile due to the shattered glass and sub par tools. There were no tools included with the other company's product, and the adhesive was stuck to a piece of transfer paper that had been folded up and placed in the bag with the digitizer (rendering it unsable). The first digitizer cracked along the lower left corner on the last seating push into the frame. It also made short work of cleaning all old adhesive off the frame before installing the new glass. The new glass has segmented plastic covers for all adhesive strips on the underside of the glass, as well as the adhesive strips on the home button cable and screen sensor cables. I have included a link to a good article on how to replace the digitizer, as this does not come with any instructions. I cannot speak for other people, but you wouldn't be reading this review if you planned on going with original equipment. If the color of the INSIDE of your iPad digitizer is so concerning, then you've either got too much time or too much anal retentiveness. I also read a lot of reviews that talked about a visible grid on the digitizer. Yes, this one has a visible grid - HOWEVER, the iPad has to be off, you have to get a glare on the screen, and you have to get closer to the digitizer than Apple ever intended you to be (I mean inches). ;) If you're reading this review, you're looking for a cheap alternative DIY solution to a broken digitizer because you don't want to pay Apple's insane replacement price. -Included extras (wet/dry screen wipes, cleaning cloth) work perfectly. Cons: -Home button is slightly recessed (see pic). -Antenna is silver, not gold (like original - get over it, ya bunch of whiners! See comments above). -SLIGHTLY visible grid (see comments above). Some pointers for installation: -Start in the lower left hand corner (with the home button side facing you) and work clockwise around the glass to remove it. Be careful about sticking the spudger in too far around the camera and the lower right corner (four cables in this area). -Use a hair dryer unless you have a heat gun. I used my wife's hair dryer on the hot setting and it was plenty to separate the adhesive. Any small object between the frame and digitizer is a potential crack area. I used the cleaning cloth included in this kit to GENTLY wipe any dust or particulate from the LCD just before I laid the digitizer down the final time. -Lay your digitizer over the frame loosely to test just before removing the adhesive covers. It's a lot easier to test functionality now than risk breaking your digitizer having to remove it to fix a bad connection. They both need to be standing up to avoid stressing the cables while reconnecting the LCD plug (with screws). If you can't find an answer on Google, I'm happy to assist if I am not busy with something else."
"One observation that I made but which was not emphasized in any of the videos is that it is important to heat the edge of the glass adequately while separating it. It seemed to work best to get it hot enough that it was uncomfortable to touch it for more than a second or so.----pretty hot. Also the zif socket that attaches the home button to the home button ribbon cable has a bail on it that should be lifted 90 degrees to open the socket prior to removing the cable."
"The 3M take provided to help seal the screen glass back onto the frame of the iPad didn't really hold all that well, especially in the corner where all of the cables mate with the iPad frame itself - the littlest bit of pressure there and it will pull the whole side of the glass away from the frame."
"I resorted to rubbing it off with my fingers until I had a balled up adhesive mess on the screen then I retried multiple times with the above chemicals to clean off the remaining residue until eventually - about an hours worth of effort - to get a clean screen."
Best Tablet Replacement Parts

Prokit White ipad mini replacement digitizer repair kit includes IC chip and Home button and tool kit with SlyPry™ opening tool PLEASE FAMILIARIZE YOURSELF WITH THE PROCESS BEFORE ATTEMPTING IT YOURSELF: We cannot accept any responsibility for any damage incurred during the replacement process. ipad mini 1 or 2 digitizer replacement kit for ipad mini version 1 or 2 in white is fully compatible with the ipad mini with retina display.
Reviews
Find Best Price at Amazon"I had read a few comments (not necessarily for this product) that complained about opening a damaged product, but being unable to prove it was damaged in transit, they were out the money. I knew from the description that it would not come with instructions, and I was confident I could figure it out using resources online. Here are my suggestions: It takes several minutes to heat the adhesive enough to remove it quickly using a hairdryer. Watch the video a few times so you know what order to put it all back together. Tap all the corners, try out the keyboard, make sure the home screen works."
"Just seeing vertical lines along the left quarter of the picture now... As for the new digitizer, I haven't removed the plastic covering and put it through all its paces but it responded to my swiping just fine in the brief on/off I did a few times."
"the thin metal tool that comes in the kit is especially good at getting under shattered glass fragments."
"And make sure to push it completely together when testing it, not just lay it on top. I had to remove it (secured on by adhesive), remove some adhesive from the plastic, lay it on top of the camera and lower the digitizer on top of it to reapply."
"As for the adhesive I had amazing luck using Permatex Sensor Safe. https://www.amazon.com/Permatex-80022-Sensor-Safe-Silicone-Gasket/dp/B0002UEOKK. Just a bit around the edges where the glass sits and 24 hours later it had no give."
"The reason why I gave it only four stars is because it doesn't tell you TO REMOVE THE FILM FROM THE ADHESIVE and the home button is kinda weak."
"I ordered this to replace the shattered screen on my iPad mini."
"This is a task that involves tiny parts that are hard to hold but a little patience and the job is done."
Best Tablet Flex Cables

Color: As Picture Shown; Package Content: 1 x Wifi Antenna for iPad 2; This is a non-OEM generic product; Accessory Only! Product Name: Wifi Antenna.
Reviews
Find Best Price at Amazon"It works just fine, but the cable was about 5mm too long making the seating of the antenna array over the mounting screw holes much more difficult than it should have been. Not a big deal to me since I was replacing the battery pack as well and that requires an almost total tear-down of your iPad."
"The WiFi antenna is in a position in the iPad that makes it almost certain to be badly damaged if you change out h glass in your iPad."
"Because the original antenna doesn't break on it's own, I assume 100% of the buyers are people like me who already opened it up to fix the screen, so if you've gone that far, the extra steps required to put the antenna in are child's play."
"You can clearly see a small bracket on the wire between the taped wire and the antenna circuit itself. It means that the wire is not proper routed in the iPad."
"I am the amateur iDevice repair person among my family and friends and have purchased many batteries and screen replacements on Amazon."
"Screen replacement is a little tricky but once screen is off, antenna replacement is a snap."
"We followed an instructional video to replace the digitizer on our iPad 2 and thanks to other reviews, we knew to purchase the antenna when ordering the kit because it would most likely be damaged while removing the cracked screen- and it was."
Best Tablet Batteries

touch-screen-tablet-computer-batteries. Enter your model number to make sure this fits.
Reviews
Find Best Price at Amazon"I have no idea what the little three pointed-thing is for. If you look on YouTube, there are several sets. Took it apart again, took all the connectors out, replaced them making sure they were seated fully before snapping the little holders down. Haven't had it long enough to check the battery life yet, the reason I replaced the old one was as the others have noted... After a couple of years the battery would drain rapidly."
"The screws holding the battery in place are extremely small but one of the screwdrivers fit just fine."
"I was skeptical about buying thus battery but I decided to take the chance and I’m glad I did because it works great do far."
"I have been able to replace the battery on my tablet using this kit."
"Have to say my old Samsung Tab4 original battery didn't see to have near the life this Empire replacement does."
"Worked great... went from having to recharge my Tab 4 ever hour or two, back to being able to use it most of the day before having to recharge."
"Watch a 5 minute YouTube video and it will be easy with included tools."
"Installed the battery last night."
Best Tablet LCD Displays

Reviews
Find Best Price at Amazon"I made him work it off for 3 months before we bought this and he wasn't allowed to use the iPad anymore since there was broken glass everywhere. - It was packaged very nice and neat in a small sturdy box surrounded by foam boards. - It includes the WiFi antenna, middle frame bezel (which already has the stickers attached to it) makes it super easy!, and the Front Digitizer w/ home button. Since I've ordered replacement screens for the iPhones, I saved all those tools which work perfectly for this project."
"The screen fits like it's suppose to, the antenna works, the touch screen feels just the original, iPad is back and running."
"This has been a life saver with two small kids prone to breaking screens."
"Worked great on our old ipad 2."
"It fixed a broken screen and looks good, but the tape on these screen never seem to hold."
"the extra parts definitely worth the extra money, and warranty is awesome."
"It took me a while to finally replace one of my ipad's screen with this order, but glass is too thin."
"worked nice but then there's a glitch and now I have a big dark line in my screen."
Best Tablet Digitizers
Prokit White ipad mini replacement digitizer repair kit includes IC chip and Home button and tool kit with SlyPry™ opening tool PLEASE FAMILIARIZE YOURSELF WITH THE PROCESS BEFORE ATTEMPTING IT YOURSELF: We cannot accept any responsibility for any damage incurred during the replacement process. ipad mini 1 or 2 digitizer replacement kit for ipad mini version 1 or 2 in white is fully compatible with the ipad mini with retina display.
Reviews
Find Best Price at Amazon"I had read a few comments (not necessarily for this product) that complained about opening a damaged product, but being unable to prove it was damaged in transit, they were out the money. I knew from the description that it would not come with instructions, and I was confident I could figure it out using resources online. Here are my suggestions: It takes several minutes to heat the adhesive enough to remove it quickly using a hairdryer. Watch the video a few times so you know what order to put it all back together. Tap all the corners, try out the keyboard, make sure the home screen works."
"Just seeing vertical lines along the left quarter of the picture now... As for the new digitizer, I haven't removed the plastic covering and put it through all its paces but it responded to my swiping just fine in the brief on/off I did a few times."
"the thin metal tool that comes in the kit is especially good at getting under shattered glass fragments."
"And make sure to push it completely together when testing it, not just lay it on top. I had to remove it (secured on by adhesive), remove some adhesive from the plastic, lay it on top of the camera and lower the digitizer on top of it to reapply."
"The reason why I gave it only four stars is because it doesn't tell you TO REMOVE THE FILM FROM THE ADHESIVE and the home button is kinda weak."
"I ordered this to replace the shattered screen on my iPad mini."
"This is a task that involves tiny parts that are hard to hold but a little patience and the job is done."
"I ordered one from a different Amazon seller, installed it and it didn't respond 50 percent of the time."